
There are multiple reasons for a website migration – switching content management systems, design limitations, enhancing functionality or performance, etc. A full website migration is no easy feat – even in optimal conditions – one thing you need to prioritize is your site’s search engine optimization to prevent traffic loss.
Not focusing on SEO has the potential to significantly affect the search visibility of your site. Our website migration checklist is intended to help you better plan and manage a website migration, reducing the impact on organic rankings and traffic.
It all starts with planning – ensuring that the site’s SEO needs are factored into the broader plan
Pre-migration activities identify all the requirements needed for the migration.
Migration day is very crucial. You have to check and ensure multiple parameters are as expected to ensure the migration is successful.
In the post-migration phase, you track and check if the migration was planned and executed effectively and make any changes if necessary.
It’s a broad term used by digital marketers and web development teams to describe any substantial changes the website is undergoing. The change could be the website’s structure, platform, content, design, technology, etc.
A change from HTTP to HTTPS to provide better security to your users. This is a simpler site migration.
This is a very common change to the website where a subfolder is moved to a sub-domain or vice versa. A common example is moving the blogs from blog.website.com to website.com/blog.
Change in the domain name is when the entire content of the website is moved to a different domain.
This is when the architecture of the website is changed. This often includes URL structure changes and internal linking changes.
When a brand decides to move the website to a different CMS or technology platform due to a specific feature or functionality of the platform. An example is moving an e-commerce website from WordPress + WooCommerce to Magento.
Redesigning the website is required every few years to give it a fresh look. Website redesign includes significant media, code, and copy changes.
Sometimes, merging 2 or more websites could be a strategic business decision. Ensuring that the organic traffic of both websites is retained can be tricky.
Migration types can be combined in any way possible, depending on the business needs. The more changes are made at the same time, the complexity and risks are higher. But making more changes simultaneously is justified considering the cost-effectiveness, provided the migration is planned and executed well.
Site migration can have a significant impact on your SEO and the organic traffic to your website if it’s not executed effectively. Recovering from the impacts of a poorly managed migration could take weeks to months.
After a website migration, Google needs to crawl and re-index the pages of the website. If the migration is not completed properly, Google could miss many important pages on the website, and you could lose significant traffic.
This website migration checklist (links below to the checklist) helps you ensure the migration is completed smoothly with minimal drop in traffic.
It really depends on the type and complexity of the migration. With a small site with a simple design, the process can be completed in a few days. If you are migrating a larger website with a complex structure and design, the process can take weeks to months.
That’s why it’s important to have a plan in place to ensure enough resources are allocated to each step in the process. A poorly planned migration can result in lost data (or content), broken links, de-indexed pages, etc.
Depending on the complexity and breadth of the migration there are multiple things that can go wrong, these are some of the most common.
Before you even start the work of migration – it can go off the rails. Approach the migration focused on your goal (or what you’re trying to solve). Is it to update functionality, and usability (for internal and external users) or whether you’re bringing in a new CMS – this should be at the forefront of your strategy.
A detailed project plan is a necessity for any website SEO migration. Project plans will help you capture all activities and avoid delays in migrations.Even with your best-laid plans, not everything will go as planned, so factor in delays.
We recommend avoiding planning a migration during seasonal activity peaks (end-of-year holidays etc). If anything goes wrong, there’s no room for error. Plan the migration during an off-season period.
Website migration can impact your SEO efforts and organic traffic significantly. You’ll need search engines to re-index your site, post-migration. You want to make that your SEO team or vendor is involved in the migration process to ensure you don’t miss critical SEO optimization techniques that could have a negative impact on traffic/volume.
Testing your website during all stages of migration is critical to success. There are many moving parts to migration – and you should factor in testing to limit factors that can go wrong during a migration.
As you test, you will find the occasional bug or defect – these have to be categorized and addressed based on impact and severity.
Writing a guide to help factor in SEO in your website migration isn’t just theory. We put it into practice.
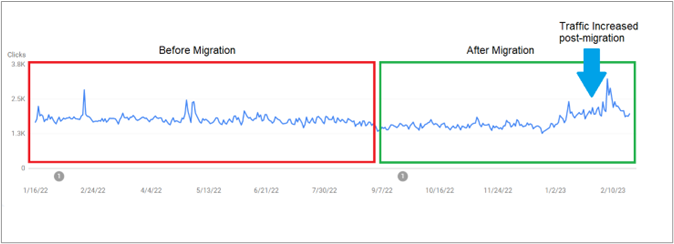
We wanted to share what we actually delivered for one of our clients post-migration. We executed what we discuss here and helped deliver substantial growth for our client. As you can see from the graph below – we helped prevent a drop in traffic – eventually delivering more traffic compared to pre-migration.
Following these steps will help reduce any drop in traffic (and revenue) post-migration.
You need to be very clear about the objectives of the migration. Whether it’s a design overhaul of the website or changing the CMS, the objective of the migration will differ. It’s important to be clear about the objective and set the right expectations.
The site migration is also a good opportunity to fix any critical issues on the website, as the resources required for fixing these issues post-launch will be significantly higher.
When you migrate your current site is just as important. If it fits with your marketing and business strategy – choosing an off-peak time is preferred.
Planning is always important – identifying the objectives and laying out a detailed plan to tackle those objectives will be critical for success. A complex project with multiple phases and stakeholders needs the structure of a project plan. All dependencies should be identified and included in the project plan so that every task owner is aware of the dependencies.
In order to keep your migration on track – identify the task owners – those responsible for the execution of specific tasks within the migration plan. Once identified, task owners should know what’s needed, the timelines, and the dependencies.
Seems obvious, but backing up the site is a best practice. Consider creating a dev (and staging) environment. A dev environment allows the development to go unimpeded – adding a staging environment gives you the ability to test new functionality and be able to quickly revert if need be.
After your site is migrated, it needs to be crawled and indexed by search engines to ensure your SEO efforts don’t miss a beat. Blocking access to the site as the migration is in full swing will reduce the potential for content duplication issues. Learn how to add a ‘noindex’ tag to your site here
It’s important to check the backlink profile of the new domain, especially if it was recently purchased. The backlink profile can be checked using a tool like Semrush. Always good to double-check that the domain didn’t receive a manual penalty (this can be checked in the Manual Actions Report on Google Search Console).
Crawl the old website using a tool like ScreamingFrog and keep a copy of all SEO parameters like URLs, page titles, descriptions, redirections, etc. Keep a copy of this crawl even after the site launch, just in case you need the old data.
If the structure of the new website is different, it’s important to identify those pages which require a redirect. Consider creating a redirect document to track all pages requiring it.
HTTP code 301 identifies content or a page that has been permanently moved. It’s important to redirect the old URLs to the updated ones. Not doing this, will negatively impact your site ranking and traffic.
If there are URL changes involved, update the site’s internal links so that they don’t trigger internal redirects. These internal redirects could add latency to the crawl and impact the crawl budget.
During the migration, some of the pages may be deleted. A custom 404 page allows users to easily navigate to other pages if the page they are looking for is unavailable.
Update the new URLs on Google My Business and Bing Places. Not updating the URL could result in traffic loss from these listings.
We recommend creating 2 sets of XML sitemaps, one for the older website and another for the new website. The sitemap for the new website will inform Google of the new URLs, and the sitemap of the old URLs will help Google be aware of the 301 redirections.
This will ensure the authority of the old URLs is passed on to the new ones.
Mobile-friendly websites increase traffic and revenue by providing easy access to users on mobile devices. Make sure the new website is mobile-friendly. Google’s mobile-friendly test is a great way to test your site.
Add schema to the new website. Bringing schema from the old website to the new site will help improve optimization.
Not updating the robots.txt file during a site migration is an easily missed opportunity. Ensure you update the file for the new website before the launch so the new site is easily accessible to search engines.
Update the backlinks of the website with the new URLs. Reach out to the referring websites and request they update the backlinks. Also don’t forget to change the URLs on all social media profiles and any other directories.
A pre-migration audit will help find and fix SEO issues before launch. This will ensure that the website is well-optimized. Tools like Semrush and Screaming Frog can be used to conduct an SEO audit.
During migration, the primary SEO objective is to ensure that traffic (and revenue) don’t drop off. Capturing a pre-migration benchmark of business-critical metrics will help you measure the new website’s performance after the launch.
Make sure your GA code is added on the staging website so that the website’s performance can be measured right after the launch.
Immediately after the launch, check the load performance of the website and make sure site loading is optimized. A slow-loading site could impact the organic performance of the website since it’s an important factor SEO ranking factor.
Here are some of the technical checks to do immediately after the website launch. This will ensure the website performs well after the launch.
Here are the Google Search Console (GSC) checks that help make sure Google can crawl and index the pages on the new website properly.
After the new website is launched, Google will have to crawl and re-index the website. If the server response time is high, the process of re-indexation will be slow. So, it’s important to make sure the server response is quick.
Check the crawl stats available on the Google Search Console to check if Google is crawling the new website. If you can’t see a spike in crawls after the launch, there could be something wrong with the crawling.
Conduct a post-migration audit to make sure all the SEO parameters are in place, and nothing is missed out during the launch of the new website. Any errors identified during the audit must be fixed immediately to avoid impacting search performance.
There could be a drop in organic metrics after the launch. Adding an annotation on Google Analytics will help make a note of this drop in the future.
Track the performance and compare it with the pre-migration benchmark numbers. This will help identify the efficiency of the migration and check if there is any major drop in metrics.
We’re recommending you maintain control over the old domain (unless you are planning on selling the old domain). If you’re keeping the old domain – redirect it to the new domain, page by page, to ensure the authority is passed on to the new URLs. If you don’t retain control over the old domain, the authority earned by the old domain will be lost, and you won’t be able to redirect them to the new domain and pages.
In conclusion, website migrations are complex and have many moving parts to them – a bad migration can result in a hit to your Brand’s reputation, a dropoff in traffic, and a potential loss of revenue.
If you’re planning a site migration, please use this website migration checklist to ensure you’re tracking and accounting for the critical tasks that are needed to maintain your site’s performance post-migration.

